Repairing a soft spot in an RV roof involves addressing areas of the roof that have become weak or damaged, typically due to water infiltration or structural issues. This repair process aims to restore the roof’s strength and integrity, ensuring it can withstand the rigors of travel and weather conditions.
If you’re an RV owner, you might have encountered the worrisome issue of a soft spot in your RV roof. Wondering how to repair a soft spot in an RV roof? It’s a common concern for those looking to keep their mobile homes in tip top shape.
Repairing a soft spot in an RV roof is a crucial task to prevent further damage to your vehicle. Soft spots often indicate water damage, which can lead to more significant issues like leaks, rot, and mold. By addressing these weak areas promptly, you can extend the lifespan of your RV and enjoy worry-free travel.
Identifying Soft Spots in Your RV Roof
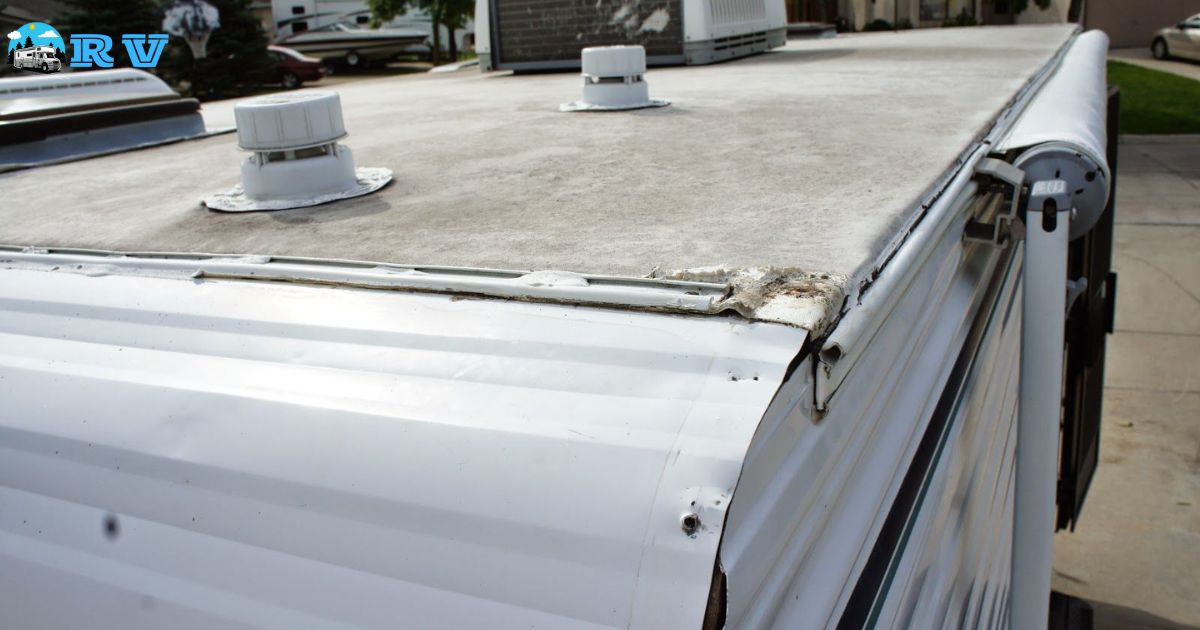
Soft spots in your RV roof can be a cause for concern, as they often indicate underlying damage or structural issues. To identify these areas, you’ll want to start with a visual inspection of your RV’s roof. Look for any areas that appear discoloured, warped, or appear to sag slightly when pressure is applied.
When conducting your inspection, pay close attention to seams, joints, and areas around vents or other roof penetrations. These are common trouble spots for softening due to potential water intrusion. Soft spots can often be hidden beneath the RV’s roof membrane, making them difficult to spot with the naked eye.
Essential Tools and Materials for RV Roof Repairs
Repairing a soft spot in your RV roof requires the right tools and materials to ensure a successful and lasting fix. Before you begin, it’s crucial to gather all the necessary items. You’ll need a utility knife for cutting away the damaged section, as well as a putty knife or scraper for removing old sealant.
In addition to tools, you’ll require materials such as replacement roofing material (e.g., plywood), sealant (typically a self-levelling lap sealant or butyl tape), and screws or fasteners for securing the new material. Safety gear, including gloves and safety glasses, is also a must.
Here’s a useful reference table summarising the essential tools and materials:
| Tools | Materials |
| Utility knife | Replacement roofing material (e.g., plywood) |
| Putty knife or scraper | Sealant (self-leveling lap sealant or butyl tape) |
| Drill with appropriate bits | Screws or fasteners for securing new material |
| Caulking gun | Tape measure |
Replacing Damaged Roofing Materials in Your RV
When you’ve identified a soft spot in your RV roof and gathered the necessary tools and materials, it’s time to replace the damaged roofing materials. Start by carefully cutting away the soft and weakened section using a utility knife. Be sure to cut beyond the damaged area to ensure you remove all compromised material.
Once the replacement material is ready, secure it in place using screws or fasteners. Make sure the new material is level with the surrounding roof surface. After securing the replacement material, it’s crucial to seal the edges and seams to prevent water infiltration.
Sealing Techniques to Prevent Future RV Roof Issues
Proper sealing is a critical aspect of repairing a soft spot in your RV roof. It not only ensures that the repair remains intact but also helps prevent future roof issues. When applying sealant, it’s essential to pay close attention to seams, joints, and areas around roof penetrations.
In addition to sealing the immediate repair area, consider inspecting the entire RV roof for any other areas that may need attention. Even if you don’t see visible damage, proactive sealing can prevent future issues from developing.
Guide to Repairing Your RV Roof
Repairing a soft spot in your RV roof might seem like a daunting task, but it can be manageable with a step-by-step approach. To help you through the process, we’ve outlined a comprehensive guide to assist you in successfully repairing your RV roof.
By following these steps and taking your time, you can restore your RV’s roof to its former strength and durability.
- Identify the soft spot on your RV roof by gently walking and pressing for weak areas.
- Remove any debris or loose material from the affected area to prepare it for repair.
- Cut out the damaged section using a utility knife, creating a clean and stable surface.
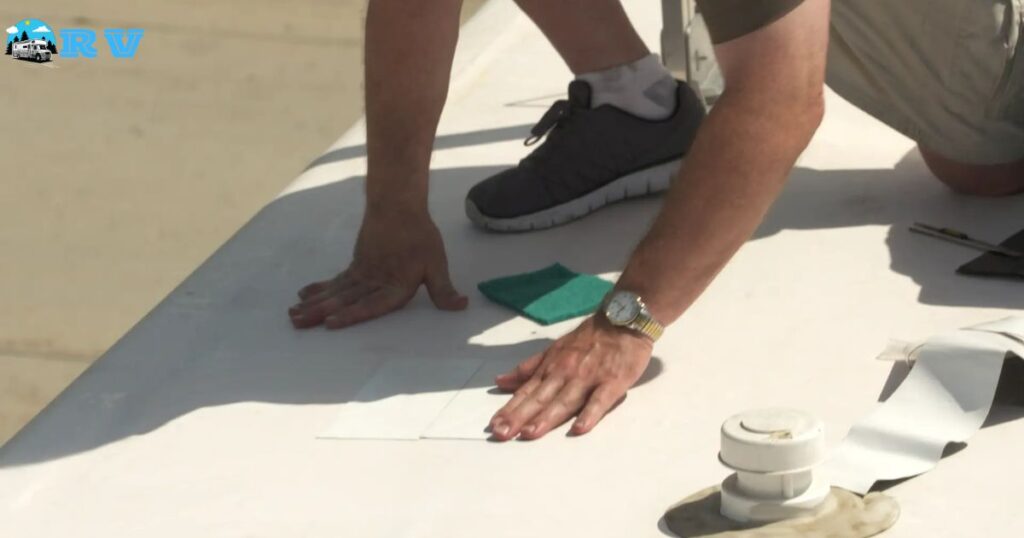
- Apply adhesive or sealant to the exposed roof structure and the underside of a replacement patch.
- Press the patch firmly onto the damaged area and let it cure as per the product’s instructions.
- Once the repair is dry and secure, inspect for leaks and reseal any seams or joints for added protection.
- Maintain regular RV roof inspections to catch and repair soft spots early, preventing further damage.
Common Causes of Soft Spots in RV Roofs
Understanding the common causes of soft spots in RV roofs is essential for both prevention and effective repair. These weak areas often result from water damage, which can occur for various reasons. Leaks in the RV’s roof can allow water to infiltrate, leading to softening and rot in the underlying structure.
Preventing soft spots in your RV roof starts with routine maintenance and inspections. Be proactive in checking your roof for any signs of damage, and promptly address any issues you discover. Regularly resealing seams, vents, and other potential entry points for water is a key preventive measure.
DIY vs. Professional RV Roof Repairs: What to Consider
Before embarking on a DIY RV roof repair project, it’s essential to weigh the pros and cons of doing it yourself versus hiring a professional. Both options have their advantages and drawbacks, and your choice should align with your skill level, time, and budget.
On the other hand, professional RV roof repairs offer the advantage of experience and the guarantee of a job well done. Experts can quickly and efficiently repair your roof, often with warranties for their work. The downside is the cost, which can be substantial.
Maintaining the Structural Integrity of Your RV Roof
Maintaining the structural integrity of your RV roof is an ongoing effort that pays off in the long run. Regular inspections, maintenance, and proactive sealing are key to preventing soft spots and other roof issues.
Schedule periodic roof inspections to identify and address potential problems before they become major headaches. Repairing a soft spot in your RV roof is a task that requires attention to detail and the right tools and materials. One important question to consider is, should you seal your RV roof.
FAQs
How can I identify soft spots in my RV roof?
Inspect your RV roof for discoloration, warping, or sponginess when walking on it. Consider using a moisture metre for more precise detection.
What tools and materials are essential for RV roof repairs?
Gather a utility knife, putty knife, drill, caulking gun, screws, sealant, safety gear, and replacement roofing material like plywood.
Are there specific sealing techniques I should use to prevent future roof issues?
Apply self-leveling lap sealant or butyl tape generously, focusing on seams, joints, and roof penetration areas to create a watertight seal.
What are the common causes of soft spots in RV roofs?
Soft spots often result from water damage due to leaks, poor maintenance, and prolonged exposure to harsh weather conditions and UV radiation.
Should I attempt DIY RV roof repairs, or hire a professional?
Consider your skills, time, and budget. DIY can save money, but professionals offer expertise and warranties, though at a higher cost.
Conclusion
In the world of RV ownership, keeping your roof in good shape is essential. A soft spot in your RV roof can signal trouble, but with the right tools and knowledge, you can tackle the issue effectively. By identifying soft spots, using essential tools, replacing damaged materials, and sealing with care, you can maintain the structural integrity of your RV roof.
Prevention and maintenance are your allies in this journey. Regular inspections and proactive measures will help you avoid soft spots and other roof problems. Whether you choose the DIY path or opt for professional help, staying vigilant about your RV’s roof health will ensure your adventures on the road remain worry-free.


