Wiring an inverter to an RV breaker box involves connecting an inverter’s output to the RV’s electrical system. This enables the inverter to convert DC power from the RV’s batteries into AC power for the RV’s appliances. Proper installation is essential for safe and efficient use of the inverter within the RV.
Unlock the power of your RV with a simple solution. Learn how to wire an inverter to your RV breaker box. Whether you’re a seasoned RVer or just starting out, mastering this essential skill can enhance your travels and bring comfort to the road. And take your RV adventures to the next level today.
Ensuring you have power wherever you go on the road. This simple guide simplifies the process, making it accessible for all RV enthusiasts. Upgrade your RV experience today.
Wiring the Inverter to Your RV Breaker Box
Wiring the inverter to your RV breaker box is a crucial step in setting up your recreational vehicle’s electrical system. This connection allows the inverter to supply power to your RV’s appliances and outlets when you’re not connected to an external power source.
By following the manufacturer’s instructions and ensuring a secure and proper connection, you can enjoy the convenience of using your electrical devices while on the road, making your RV adventures even more comfortable and enjoyable.
Safety First
Before you begin any electrical work, safety should be your top priority. Always disconnect the RV from any external power source and turn off the RV’s main breaker. Make sure you have the necessary safety equipment on hand, such as insulated gloves, safety glasses, and a multimeter. If you’re not comfortable working with electricity, it’s wise to seek professional help.
Choosing the Right Inverter
Selecting the right inverter is crucial for this project. The inverter’s capacity should match your power needs. If you plan to run high-wattage appliances, a larger inverter is necessary. On the other hand, if you have more modest power requirements, a smaller inverter will suffice. Make sure to consider your RV’s available space for installation and your budget when choosing an inverter.
Wiring the Inverter
Wiring the inverter is a crucial step in setting up a solar power system. The inverter converts the direct current (DC) electricity generated by the solar panels into alternating current (AC) electricity that can be used to power homes and appliances. Properly connecting the inverter
To wire the inverter, you’ll need to follow the manufacturer’s instructions carefully, connecting the DC input from the solar panels and the AC output to your electrical panel.
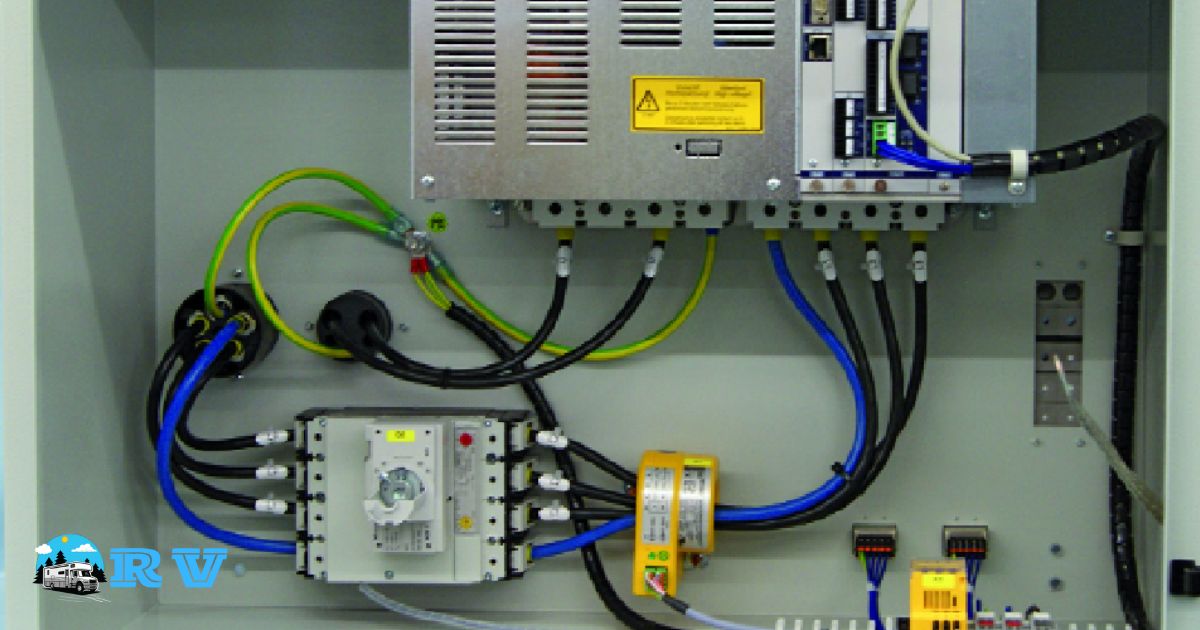
Locate the Inverter Installation Spot
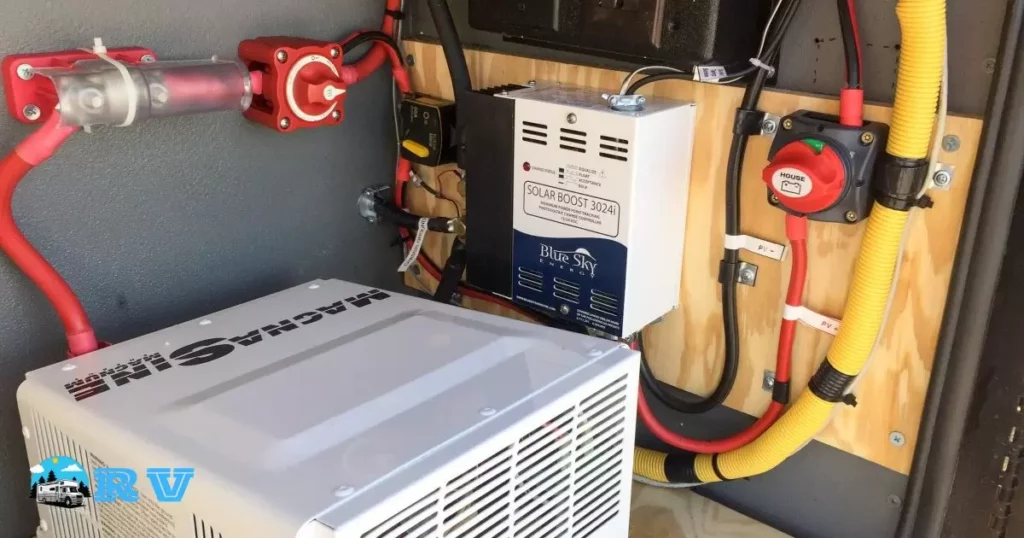
The inverter should be installed as close to the RV breaker box as possible to minimize power loss. Find a suitable location that is well-ventilated, away from direct sunlight, and protected from moisture. Common installation spots include storage compartments, under a bed, or inside a dedicated cabinet.
Preparing the Cables
To connect the inverter to the breaker box, you’ll need to prepare the necessary cables. Ensure you have high-quality, appropriately sized cables for both the DC and AC sides. The cable size should match the inverter’s capacity and the distance between the inverter and the breaker box. Typically, 4/0 or 2/0 gauge cables are suitable for most RV applications.
Selecting the Right Wire Size for your Inverter
Selecting the right wire size for your inverter is crucial for ensuring a safe and efficient electrical system. The wire size should match the inverter’s power requirements to prevent overheating and energy loss. Always consult the manufacturer’s guidelines or an electrician to make the best choice and enjoy a reliable inverter setup.
In summary, choosing the correct wire size for your inverter is a fundamental step in setting up your electrical system. It ensures that your inverter operates optimally and safely, providing the power you need for your various electrical devices and appliances. You might be wondering, Should you seal your RV roof? This is another essential consideration for maintaining the longevity and integrity of your recreational vehicle.
Determine the Current
To find the right wire size for your inverter, check its current rating first. Choose a wire with a gauge that can handle the inverter’s maximum current. Using the correct wire size ensures safe and efficient power transfer.
Account for Power Factor and Efficiency
When choosing the right wire size for your inverter, consider power factor and efficiency to ensure optimal performance. Correct wire size helps reduce power loss and ensures your inverter operates efficiently. Make an informed choice for a reliable power system.
Add Safety Margin
When choosing your inverter’s wire size, add a safety margin to ensure reliable performance. This extra precaution helps prevent overheating and potential electrical issues.
Select the Correct Wire Size
Choosing the right wire size for your inverter is essential for safety and efficiency. Incorrect wire size can lead to overheating or power loss. Consult your inverter’s manual for the correct wire size guidelines.
Connecting the Inverter
Connecting the inverter is a crucial step in setting up a solar power system. The inverter is the device responsible for converting the direct current (DC) electricity generated by the solar panels into alternating current (AC) electricity that can be used to power your home.
To connect the inverter, you will typically need to follow the manufacturer’s instructions, ensuring that it is properly wired to your electrical panel and the solar panel array. Once this connection is established, your solar power system will be ready to generate clean and renewable energy for your household.
| Step | Task |
| Step 1 | Connect the inverter’s positive (red) cable to the positive terminal of the RV’s battery bank. |
| Step 2 | Connect the inverter’s negative (black) cable to the negative terminal of the RV’s battery bank. |
| Step 3 | Install a dedicated AC outlet inside the RV to connect to the inverter’s AC output terminals. |
| Step 4 | Route wiring from the inverter’s AC output terminals to a spare breaker slot in the RV’s breaker box. |
| Step 5 | Secure the wiring with proper strain relief and cable clamps |
Connect the DC Side
Begin by connecting the DC side of the inverter. This involves connecting the positive (red) cable from the inverter to the positive terminal on your RV’s battery bank. Similarly, connect the negative (black) cable to the negative terminal of the battery bank.
It’s crucial to ensure a secure and corrosion-free connection. Use appropriately sized lugs and heat-shrink tubing to cover the connections. This will prevent any accidental short circuits and maintain a reliable power supply.
Connect the AC Side
Next, connect the AC side of the inverter. Locate the breaker box inside your RV, and identify the main AC input breaker. This breaker should be turned off during installation. Remove the cover panel of the breaker box.
install a dedicated AC outlet inside your RV to connect to the inverter. This outlet should be connected directly to the inverter’s AC output terminals. You may want to consult an electrician for this part, as it involves working with AC wiring and should comply with local electrical codes.
Testing and Safety
Testing the System
Before closing up the breaker box and securing the inverter in its chosen location, it’s crucial to test the system. Turn on the inverter and check if you have power at the dedicated AC outlet. You can use a simple appliance, such as a lamp or a phone charger, to verify that the inverter is working correctly.
Also, check the connections on the DC side to ensure there are no loose wires or signs of overheating. Monitoring the inverter’s performance and safety features is an ongoing responsibility for RV owners.
Safety Precautions
Once everything is functioning correctly, don’t forget to label the newly added breaker to indicate that it is powered by the inverter. This will help you easily identify which circuits are in use when you switch between shore power and battery power.
Regularly inspect the system for loose connections or damage. If you encounter any issues, address them promptly to ensure the safety and reliability of your electrical setup.
FAQ’s
How do you connect an inverter to a circuit breaker?
To connect an inverter to a circuit breaker, route the inverter’s AC output to a spare breaker slot in the breaker box, ensuring secure wiring and following safety guidelines.
Can you wire an inverter to a fuse box?
Yes, you can wire an inverter to a fuse box, but it requires proper electrical knowledge and safety precautions to ensure a successful and safe installation.
How to wire an inverter into a motorhome?
To wire an inverter into a motorhome, connect the inverter’s DC input to the battery, and route the AC output to the motorhome’s electrical system via a dedicated AC outlet and breaker.
Conclusion
Can significantly enhance your RVing experience by providing a reliable source of AC power when you’re off the grid. This project requires careful planning, the right components, and a focus on safety.
Whether you’re a seasoned RVer or a newbie, taking the time to understand your RV’s electrical system and how to integrate an inverter will make your adventures more comfortable and enjoyable. With the right tools, proper installation, and ongoing maintenance, you’ll be well-prepared to power your essential appliances and devices wherever your RV takes you.
By following the steps outlined in this guide, you can confidently wire your inverter to your RV’s breaker box and unlock the full potential of your RV’s electrical system, all while maintaining a high level of safety throughout the process. So, get ready to hit the open road and enjoy all the conveniences of home, no matter where your RV adventures may lead.


