An external antenna for an RV, or recreational vehicle, is a device designed to improve signal reception. It captures signals from outside sources like TV or radio broadcasts, and brings them into your RV. This antenna is mounted on the outside of the RV, often on the roof, to maximize signal strength and quality.
Ever found yourself struggling with poor signal reception while traveling in your RV? You’re not alone. Many RV enthusiasts face this challenge, but there’s a simple solution: learning how to hook up an external antenna to your RV.
Hooking up an external antenna to your RV involves a few key steps. First, you need to choose the right type of antenna based on your needs, whether it’s for TV, radio, or internet signals. Then, you’ll install it at an optimal location on your RV, usually the roof, and connect it to your internal systems.
Understanding the Basics of RV External Antennas
External antennas for RVs are designed to enhance signal reception while on the road. They capture signals more effectively than internal antennas, providing better TV, radio, and internet reception. These antennas are typically mounted on the RV’s exterior, often on the roof, to achieve the best possible signal.
Understanding the basics of these antennas is crucial for any RV owner looking to stay connected. RV external antennas come in various types, each suited for different signal needs. They range from omnidirectional antennas, which receive signals from all directions, to directional antennas, which must be pointed towards a specific signal source.
Choosing the Right External Antenna for Your RV
Selecting the right external antenna involves considering several factors. Think about the types of signals you need – TV, radio, or internet – and the areas you’ll be traveling in. Some antennas are better suited for urban areas, while others perform well in remote locations. , consider the antenna’s range, as a longer range can capture signals from further away.
The second factor to consider is compatibility with your RV. Ensure the antenna you choose can be easily mounted on your RV and is compatible with your vehicle’s existing systems. It’s also worth considering the antenna’s durability and resistance to weather, as it will be exposed to various environmental conditions.
Guide to Installing an External Antenna on Your RV
| Step | Description | Tools Needed |
| 1 | Choose the optimal mounting location | Measuring tape |
| 2 | Secure the mounting bracket | Drill, screws |
| 3 | Attach the antenna to the bracket | Screwdriver |
| 4 | Connect the antenna to your RV’s system | Coaxial cable |
| 5 | Test and adjust the antenna for best reception | Signal meter |
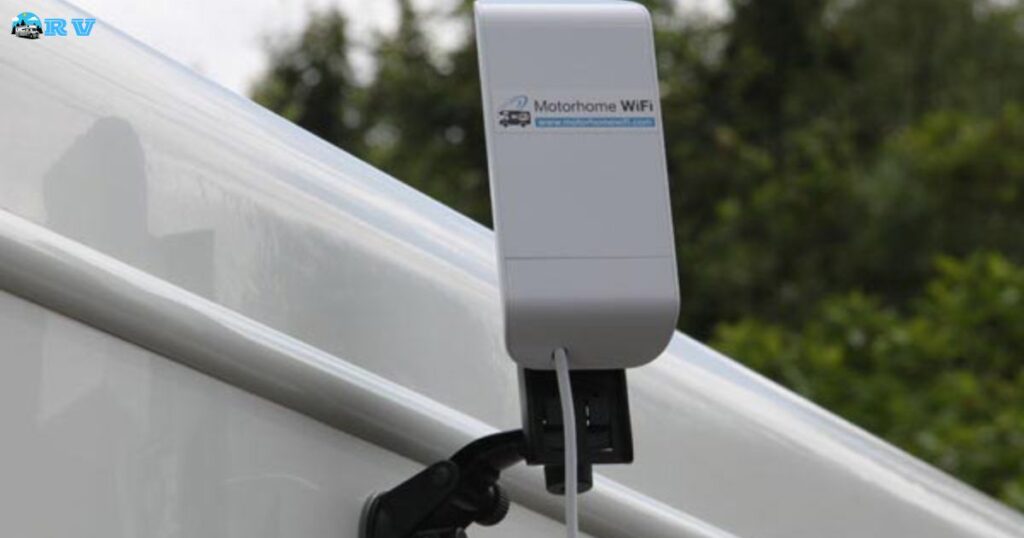
Installing an external antenna on your RV is a straightforward process that can be completed in a few steps. First, decide where to mount the antenna. The roof is often the best spot for clear signal reception. Ensure the location is flat and allows the antenna to extend without obstructions. Safety is paramount during installation, so take necessary precautions.
Once you’ve chosen a location, the next step is mounting the antenna. This involves attaching a bracket to the RV’s roof and then securing the antenna onto it. It’s important to ensure the antenna is firmly attached to withstand travel and weather conditions. After mounting, connect the antenna to your RV’s system using the appropriate cables and test the reception, making adjustments as needed.
Tools and Equipment Needed for Antenna Installation
For a successful antenna installation, certain tools and equipment are essential. A drill and screws are needed to secure the mounting bracket to your RV’s roof. A screwdriver is necessary for attaching the antenna to the bracket. Make sure to have these tools on hand before beginning the installation process.
Other important items include a measuring tape for precise placement, a coaxial cable to connect the antenna to your RV’s system, and a signal meter for testing reception. A sealant may also be required to waterproof the installation area. Having all these tools and materials prepared in advance will make the installation process smoother and more efficient.
Placing the External Antenna for Best Reception
The placement of the external antenna is crucial for optimal reception. The higher the antenna is placed, the clearer the signal it can receive. The roof of the RV is generally the best spot, as it provides an unobstructed view of the sky. Avoid placing the antenna near metal objects or electronic devices that could interfere with signal reception.
Orientation is another key factor in antenna placement. For directional antennas, aligning them towards the nearest signal source is essential. For omnidirectional antennas, ensure they are mounted upright for best all-around reception. Test different positions to find the spot where you get the strongest signal.
Optimizing Antenna Placement for Maximum Signal Reception
To maximize signal reception, fine-tuning the antenna’s position is often necessary. This involves adjusting the antenna’s angle and direction to find the strongest signal. A signal meter can be invaluable in this process, allowing you to see the signal strength as you make adjustments.
Environmental factors can also impact signal reception. Trees, buildings, and even weather conditions can affect signal strength. Be prepared to re-adjust the antenna’s position when you change locations or if environmental conditions change. This ensures you always have the best possible reception.
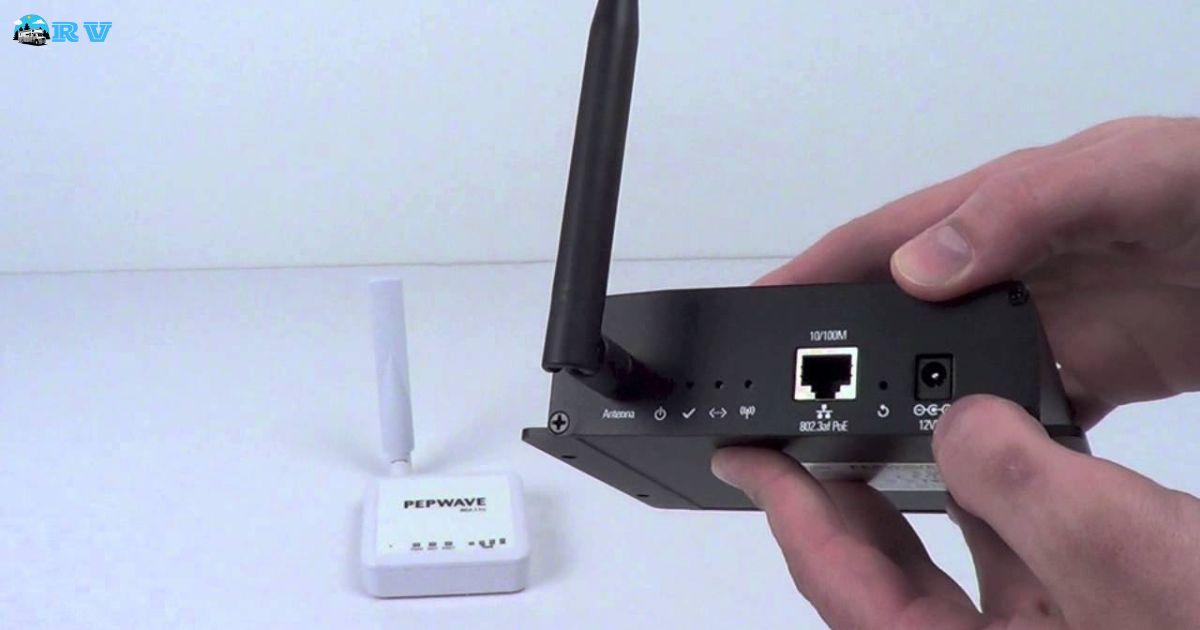
Connecting the External Antenna to Your RV’s System
Connecting the external antenna to your RV’s system is a critical step. This is usually done using a coaxial cable, which should be connected from the antenna to the RV’s input port. Ensure the connections are tight and secure to avoid signal loss. It’s also important to route the cable in a way that avoids damage or wear.
Once connected, you need to configure your RV’s system to recognize the external antenna. This might involve adjusting settings on your TV, radio, or internet device. Refer to your device’s manual for specific instructions on how to do this. Proper configuration ensures you get the full benefit of the enhanced signal provided by the external antenna.
Troubleshooting Common Issues in RV Antenna Setup

Common issues with RV antenna setups include poor signal reception and intermittent connections. If you experience poor reception, first check the antenna’s placement and orientation. Make sure it’s properly aligned and free from obstructions. Also, inspect the coaxial cable for any damage or loose connections.
If the problem persists, consider the type of antenna you’re using. It might not be suitable for the area you’re in or the type of signal you’re trying to receive. Upgrading to a more appropriate antenna can often resolve these issues. , using a signal booster can enhance reception in areas with weak signals.
Maintaining Your RV’s External Antenna for Longevity
Regular maintenance is key to ensuring your RV’s external antenna remains in good condition. Inspect the antenna periodically for any signs of wear or damage, especially after long trips or exposure to harsh weather conditions. Tighten any loose screws and replace worn parts as needed.
Cleaning the antenna is also important. Dust, dirt, and debris can accumulate on the antenna, potentially affecting its performance. Gently clean the antenna with a soft cloth and mild detergent. Avoid using harsh chemicals or abrasive materials that could damage the antenna.
Enhancing RV Internet and TV Reception with External Antennas
Enhancing your RV’s internet and TV reception is one of the primary benefits of installing an external antenna. For TV reception, an external antenna can provide access to more channels with clearer picture quality. This is especially beneficial when traveling in areas where signal strength is traditionally weak.
For internet reception, an external antenna can improve the reliability and speed of your connection. This is particularly useful for RVers who work or stream media while on the road. A stronger internet signal means less buffering and better overall performance, making your travels more enjoyable and connected.
Safety Precautions During Antenna Installation and Use
Safety is paramount during the installation and use of an external antenna on your RV. When installing, be cautious when working at heights, and consider using a safety harness if necessary. Ensure the RV is parked on stable ground, and the area is clear of obstacles. It’s crucial to be aware of safety measures related to RV equipment, such as turning off propane alarms in your RV to prevent any potential hazards.
During use, be aware of your antenna’s height and the clearance needed. This is important when driving under bridges or through tunnels. Always retract or lower the antenna as needed to avoid collisions. Also, during storms or high winds, it’s advisable to retract the antenna to prevent damage.
Comparing Different Types of RV External Antennas
There are several types of RV external antennas, each with its own advantages. Directional antennas are ideal for receiving signals from a specific direction, making them suitable for stationary use. Omnidirectional antennas, on the other hand, can receive signals from all directions, making them better for use while traveling.
Another consideration is the type of signal the antenna is designed to receive. Some antennas are made specifically for TV signals, while others are designed for radio or internet signals. There are also multi-purpose antennas that can handle multiple types of signals, offering greater flexibility.
DIY Tips for RV External Antenna Hookup
For those who prefer a DIY approach, installing an external antenna on an RV can be a rewarding project. Begin by thoroughly researching and planning your installation. This includes choosing the right antenna, identifying the best location for installation, and gathering all necessary tools and materials.
During installation, take your time and follow the instructions carefully. If you’re not confident in your ability to safely install the antenna, consider seeking help from a professional. Remember, a properly installed antenna not only provides better reception but also ensures safety and longevity of the equipment.
FAQs
How do I connect an external antenna to my RV?
To connect an external antenna to your RV, locate the antenna input on your RV’s TV or entertainment system and connect the antenna cable to it.
What type of external antenna should I use for my RV?
Choose an external antenna designed for RV use, such as an omni-directional or directional antenna, depending on your camping locations and preferences.
Do I need any special tools to install the external antenna on my RV?
You may need basic tools like a coaxial cable cutter/stripper and a wrench to secure the antenna, but most installations are straightforward.
Conclusion
Upgrading your RV with an external antenna is a smart move for any traveler. It not only enhances your entertainment options but also keeps you connected no matter where your journey takes you. By following the guidelines and tips provided, you can ensure a successful installation and enjoy improved TV, radio, and internet reception.
Remember, the right antenna and proper setup are key to maximising your on-the-road experience. Taking the time to install and maintain an external antenna is worth the effort. It adds convenience and comfort to your RV adventures, making every trip more enjoyable. Whether you’re a tech-savvy RVer or new to the world of external antennas, the process is straightforward and rewarding.


